Decorators
Decorators are generic, configurable, reusable objects designed to be attached to elements to add custom rendering effects across their surface. Decorators render on top of an element’s border and background. For a full description on how decorators are attached to elements and configured through RML, see the relevant section in the RCSS documentation.
Decorator overview
RmlUi ships with several built-in decorators, from displaying a single image, to tiling images, and gradients. Depending on how fancy you want your elements to look, you may need to develop custom decorators. Custom decorators are defined and instanced in a similar way to custom elements. A custom decorator class is created, which needs to derive from Rml::Decorator, and an instancer is registered for it with the RmlUi factory.
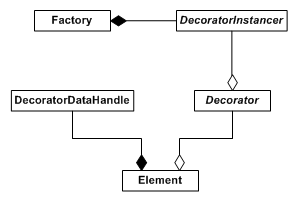
In order to optimise memory usage, decorators are shared between elements where appropriate. For each decorator it has, an element maintains a handle to arbitrary per-element data that the decorator can generate if required. For example, consider the document generated by the following RML.
<rml>
<head>
	<style>
		button
		{
			decorator: image( button.png );
		}
	</style>
</head>
<body>
	<button id="restart">Restart</button>
	<button id="restore">Restore</button>
	<button id="quit">Quit</button>
</body>
</rml>
Here, only one actual decorator will be instanced; that decorator will be shared across all three button elements. The entire decorator system looks like the following:
Custom decorators
If you need custom decoration above what the built-in decorators can provide, you can easily create a custom decorator to suit your needs.
Creating a custom decorator
All custom decorators are classes derived (not necessarily directly) from Rml::Decorator. There are three virtual functions that need to be overridden in a custom decorator:
// Called on a decorator to generate any required per-element data for a newly decorated element.
// @param[in] element The newly decorated element.
// @param[in] paint_area Determines the element's area to be painted by the decorator.
// @return A handle to a decorator-defined data handle, or zero if no data is needed for the element.
virtual Rml::DecoratorDataHandle GenerateElementData(Rml::Element* element, BoxArea paint_area) = 0;

// Called to release element data generated by this decorator.
// @param[in] element_data The element data handle to release.
virtual void ReleaseElementData(Rml::DecoratorDataHandle element_data) = 0;

// Called to render the decorator on an element.
// @param[in] element The element to render the decorator on.
// @param[in] element_data The handle to the data generated by the decorator for the element.
virtual void RenderElement(Rml::Element* element,
                           Rml::DecoratorDataHandle element_data) = 0;
GenerateElementData() will be called by an element that uses the decorator before the first time it is rendered and whenever it is resized. If the decorator needs to store data for each element that uses it, it can generate the data in this function and return a handle to it. The DecoratorDataHandle, like all handle types, is a pointer-sized type. If no data is required, return zero (0). Therefore make sure that for your decorators, 0 is not a valid handle!
ReleaseElementData() will be called by an element when it needs to release a non-zero data handle that was generated for it by the decorator. The decorator should free any resources allocated for the data handle.
RenderElement() will be called every frame when the element wants the decorator to render its decoration on the element. It passes in itself as well as the data handle that the decorator generated for it previously; this will be zero if no data was generated. The decorator is free here to execute any rendering code necessary. Remember that the clipping region will be set up at this point as appropriate for the element; you’ll need to disable it if you want to render outside the element’s bordered area. If you do so, remember to enable it again as appropriate, otherwise RmlUi may render clipped content.
Generating geometry
Custom decorators do not need to render their geometry through RmlUi’s render manager. Decorators may want to talk directly to their application’s renderer for full access to their native capabilities, such as fragment shaders and render textures, for advanced effects. However, you may want to render through the render manager for simplicity if that’s all you need.
In RmlUi, geometry is first constructed into the Rml::Mesh struct. This struct consists of a list of vertices and indices. There are several helpful functions in the RmlUi/Core/MeshUtilities.h header to aid with the construction, such as to generate quads, lines, backgrounds, and borders. For example, the following will generate a background mesh with a red color, using the element’s border-radius for a curved background, and the paint area passed from the GenerateElementData() function.
Rml::ColourbPremultiplied color(255, 0, 0);
Rml::Vector4f border_radius = element->GetComputedValues().border_radius();
Rml::Mesh mesh;
Rml::MeshUtilities::GenerateBackground(mesh, element->GetBox(), Rml::Vector2f(0, 0), border_radius, color, paint_area);
RmlUi uses the Geometry class internally for storing and rendering generated geometry. Each geometry object has a single vertex buffer, index buffer and an optional texture. A custom decorator can store one or more geometry objects in each decorator handle.
You can also manipulate the vertices and indices directly.
Rml::Vector<Rml::Vertex>& vertices = mesh.vertices;
Rml::Vector<int>& indices = mesh.indices;

Rml::Vertex vertex;
vertex.colour = {200, 150, 150, 200};
vertex.tex_coord = {0, 0};

vertex.position = {0, 0};
vertices.push_back(vertex);
vertex.position = {0, 68};
vertices.push_back(vertex);
vertex.position = {42, 68};
vertices.push_back(vertex);
vertex.position = {42, 0};
vertices.push_back(vertex);

indices = {0, 1, 2, 0, 2, 3};
Once the mesh is complete, it can be turned into a Rml::Geometry using the render manager. The geometry class is a unique render resource which automatically handles generating and releasing the underlying geometry resource on the renderer, through the render interface.
Rml::Geometry geometry = element->GetRenderManager()->MakeGeometry(std::move(mesh));
The geometry object takes ownership of the mesh and keeps it alive, so that the mesh data can be referred to and used for regenerating the underlying geometry resource as needed. Thus, the mesh must be moved into the constructor of the geometry. If you need a local copy of the mesh, you will need to explicitly make a copy of it.
To render the geometry, call its Render() function. This takes a translation parameter to adjust the position at which the geometry is rendered at.
Rml::Vector2f offset = element->GetAbsoluteOffset(Rml::BoxArea::Border);
geometry.Render(offset);
Creating a custom decorator instancer
The instancer for a decorator is responsible for defining and processing the properties that can be used to configure the decorator. While you can create a custom decorator with no properties, we recommend that you expose all variables to RCSS. It’s quick and easy, and you’ll have much more flexible decorators.
A decorator instancer needs to derive from Rml::DecoratorInstancer. The following pure virtual function needs to be overridden:
// Instances a decorator given the property tag and attributes from the RCSS file.
// @param[in] name The type of decorator desired. For example, "decorator: simple(...);" is declared as type "simple".
// @param[in] properties All RCSS properties associated with the decorator.
// @param[in] instancer_interface An interface for querying the active style sheet.
// @return A shared_ptr to the decorator if it was instanced successfully.
virtual Rml::SharedPtr<Rml::Decorator> InstanceDecorator(const Rml::String& name,
                                                         const Rml::PropertyDictionary& properties,
                                                         const Rml::DecoratorInstancerInterface& interface) = 0;
InstanceDecorator() will be called whenever a decorator needs to be created using this instancer. It is passed with name, the name the decorator was created with, properties, the dictionary of the properties the RCSS rules defined for the decorator (see below), and interface, an interface to help construct any resources needed by the decorator such as for constructing textures and retrieving sprites.
The property dictionary will contain an entry for every property in the decorator’s property specification; if a value was not specified in the RCSS, then the default value will be put into the dictionary for you.
Once the decorator has been constructed, return it as a shared pointer. If the decorator was not created successfully, return a nullptr to indicate an error, then any elements will ignore it.
Defining the decorator’s properties
Each decorator instancer holds a complete property specification for the decorators it creates. In its constructor, the custom instancer has the opportunity to add properties and shorthands to its specification by using the protected functions RegisterProperty() and RegisterShorthand(). For detailed documentation on defining properties, see the documentation on registering user-defined properties. Note that user-defined property parsers registered with Rml::StyleSheetSpecification can be used in decorator property specifications.
The following is an example decorator defining a simple property specification:
CustomDecoratorInstancer::CustomDecoratorInstancer() : Rml::DecoratorInstancer()
{
	property_id1 = RegisterProperty("custom-property-1", "1").AddParser("number").GetId();
	property_id2 = RegisterProperty("custom-property-2", "auto").AddParser("number")
	                                                            .AddParser("keyword", "auto, none")
	                                                            .GetId();
	RegisterShorthand("decorator", "custom-property-1, custom-property-2", Rml::ShorthandType::FallThrough);
}
The custom decorator now has two properties. The property dictionary passed into the instancer’s InstanceDecorator() function will contain values for the two properties, defaulting to their specified default values if they weren’t set in the RCSS.
Note that the shorthand decorator is special. This shorthand will be used to parse the text inside the parenthesis of the property value. This allows specifying the decorator with inline properties as in the following example.
decorator: custom-decorator( 15 auto );
Now this will be parsed by the above rules such that ‘custom-property-1’ contains 15, and ‘custom-property-2’ contains the keyword ‘auto’.
The property IDs are stored on the instancer object, so they can easily retrieve the parsed value during the call to InstanceDecorator(),
int value1 = properties.GetProperty(property_id1)->Get<int>();
The value1 variable will now contain the value specified in the style sheet, e.g. ‘15’ in the above example.
Constructing textures
The decorator instancer interface (Rml::DecoratorInstancerInterface) provides the following functions that can be used to help construct the resources needed by the decorator.
/// Get a sprite from any @spritesheet in the style sheet the decorator is being instanced on.
const Rml::Sprite* GetSprite(const Rml::String& name) const;

/// Get a texture using the given filename.
Rml::Texture GetTexture(const Rml::String& filename) const;

/// Get the render manager for the decorator being instanced.
Rml::RenderManager& GetRenderManager() const;
For example, to create a texture from a file name, you can use the GetTexture() function.
Rml::Texture texture = interface.GetTexture("button.png");
The Rml::Texture class is a simple view of its underlying texture object, and can be freely copied. The render manager handles the texture resource and constructs and releases it through the render interface. After construction, the render manager keeps the texture resource alive until specifically asked to release it, such as through Rml::ReleaseTexture(), or until the library is shut down.
It is also possible to construct the texture directly from the render manager. However, by using the above interface, the document path is automatically passed in based on where the decorator was defined, to resolve any relative paths to the texture.
Once constructed, the texture can be stored on the decorator object and used when rendering its geometry.
geometry.Render(offset, texture);
Constructing shaders
In RmlUi, shaders are extension points that can be used to render custom effects. Shaders are always rendered together with geometry, and allows the renderer to render it in any way it desires. For example, internally in RmlUi, they are used when rendering the gradient decorators. Shaders must be explicitly supported by the render interface being used.
Shaders are first compiled using the render manager, and then later provided when rendering the geometry.
const Rml::String value = "sparkling_frog";
const Rml::Box& box = element->GetBox();
const Rml::Vector2f dimensions = box.GetSize(render_area);
Rml::CompiledShader shader = render_manager->CompileShader("shader", Rml::Dictionary{
    {"value", Rml::Variant(value)},
    {"dimensions", Rml::Variant(dimensions)}
});
Then, the shader can be passed in when rendering the geometry.
geometry.Render(element->GetAbsoluteOffset(BoxArea::Border), {}, shader);
For a full example, please see the source code for Rml::DecoratorShader in the library.
Registering an instancer
To register a custom decorator instancer with RmlUi, call the RegisterDecoratorInstancer() function on the RmlUi factory (Rml::Factory) after RmlUi has been initialized.
// Registers an instancer that will be used to instance decorators.
// @param[in] name The name of the decorator the instancer will be called for.
// @param[in] instancer The instancer to call when the decorator name is encountered.
// @lifetime The instancer must be kept alive until after the call to Rml::Shutdown.
// @return The added instancer if the registration was successful, nullptr otherwise.
static Rml::DecoratorInstancer* RegisterDecoratorInstancer(const Rml::String& name,
                                                           Rml::DecoratorInstancer* instancer);
The name parameter is the string value that you will use to bind to the decorator through RML. For example, calling:
// Keep instancer alive until after the call to Rml::Shutdown().
auto instancer = std::make_unique<CustomDecoratorInstancer>();
Rml::Factory::RegisterDecoratorInstancer("custom-decorator", instancer.get());
will cause the following RML fragment to create decorators using the CustomDecoratorInstancer type:
<rml>
<head>
	<style>
		button
		{
			decorator: custom-decorator( 15 );
		}
	</style>
</head>
<body>
...
Like for other instancers, it is the user’s responsibility to manage the lifetime of the instancer. Thus, it must be kept alive until after the call to Rml::Shutdown(), and then cleaned up by the user.
Updating decorators
After being instanced, decorators are not updated from inside the library. Instead, animation of decorators in RmlUi involves destroying an existing filter and instancing a new one each time a parameter needs to be updated.
If you have a decorator that requires updating independently of the library’s animation feature, you would need to implement your own update mechanism. This could involve separately maintaining a list of the decorator data handles that require updating, and processing them when appropriate during your application’s update loop.