Building RmlUi with CMake
The following will guide you through the process of building RmlUi. This is necessary before you can integrate it into your own application. If you are just getting started, the recommended approach is to use a package manager to handle building and integration. We also encourage you to build the included samples and have a look at them.
Contents
- Prerequisites
- Building using vcpkg
- Building using Conan
- Building using Devbox
- Building on Windows
- Building on macOS and Linux
- Building using Emscripten
- CMake presets
- CMake options
Prerequisites
or
or
or
For new users, the recommended approach is to use a package manager such as vcpkg or Conan to handle building and integration of the library. These take care of dependencies and all the integration details, getting you set-up with a breeze.
For full access to all the build options, the library can be manually built using CMake. You’ll first need to download CMake or install it via a package manager of your choice. CMake is not a build system itself, its purpose is to generate Makefiles, Xcode projects and Visual Studio projects, among other formats. Next, follow the instructions for your platform below.
If you haven’t already done so, download a copy of RmlUi. You can download and extract the library as a zip file, or use git from your terminal:
git clone https://github.com/mikke89/RmlUi.git
Building using vcpkg
vcpkg is a cross-platform C/C++ package manager for acquiring and managing libraries. Read the getting started with vcpkg guide to download and install the package manager.
Then, RmlUi can be installed simply using the command:
vcpkg install rmlui
Now you are all set to integrate RmlUi, all you need to do is include the header files into your source code.
The vcpkg port supports certain features derived from the CMake options below.
| vcpkg feature | Default feature | Related CMake option | Explanation |
|---|---|---|---|
| freetype | Yes | RMLUI_FONT_ENGINE |
Include the integrated font engine based on FreeType. |
| lottie | No | RMLUI_LOTTIE_PLUGIN |
Include the Lottie plugin. |
| lua | No | RMLUI_LUA_BINDINGS |
Include the Lua bindings. |
| svg | No | RMLUI_SVG_PLUGIN |
Include the SVG plugin. |
Note that vcpkg will not install the samples which we recommend to check out before integrating the library into your own project. For this, we need to download and build RmlUi manually, but luckily vcpkg can help ease this process by handling the dependencies.
First install the necessary dependencies. Here, we choose to use GLFW as our backend, and proceed to install this dependency as well. Other backends are available as seen on the repository readme.
vcpkg install freetype glfw
Then you can run the following commands to download and build RmlUi with the samples. Make sure to replace the path to vcpkg.
git clone https://github.com/mikke89/RmlUi.git
cd RmlUi
cmake -B Build -S . --preset samples -DRMLUI_BACKEND=GLFW_GL3 -DCMAKE_TOOLCHAIN_FILE=<vcpkg-path>/scripts/buildsystems/vcpkg.cmake
cmake --build Build
Now please try out the freshly built invader sample (rmlui_sample_invaders target) and all the rest, enjoy! The executables should be located somewhere in the Build directory.
If you want to check out the remaining samples you can also install lua lunasvg rlottie harfbuzz and use the preset samples-all during the CMake configuration. There is also a comprehensive testing framework available, which can be built by additionally passing the option -DBUILD_TESTING=ON, or the CMake preset dev or dev-all.
If the version of RmlUi provided with vcpkg is out of date or somehow does not meet certain needs, then contributions would be welcome at the vcpkg repository.
Building using Conan
Conan is a C/C++ package manager which can be used for integrating and building the library, and managing its dependencies in an effortless way. If you are new to Conan, then it might be worth looking through the Conan Tutorial. Information on the RmlUi package itself is available at ConanCenter: RmlUi.
The Conan recipe that environment-specific packages are generated from supports certain options derived from the CMake options below. The following table explains options exclusive to RmlUi available in the recipe. Please bear in mind that in general the Conan community discourages double negation that would arise from naming options with one negation included (e.g. RMLUI_THIRDPARTY_CONTAINERS); this is why certain recipe options have the opposite meaning of their CMake counterpart.
| Conan option | Possible values | Default value | Related CMake option | Explanation |
|---|---|---|---|---|
| enable_rtti_and_exceptions | [True, False] | True | RMLUI_CUSTOM_RTTI |
– |
| font_interface | [“freetype”, None] | “freetype” | RMLUI_FONT_ENGINE |
The CMake option is defined when the Conan option is set to None |
| matrix_mode | [“column_major”, “row_major”] | “column_major” | RMLUI_MATRIX_ROW_MAJOR |
The CMake option is defined when the Conan option is set to row_major |
| with_lua_bindings | [True, False] | False | RMLUI_LUA_BINDINGS |
– |
| with_thirdparty_containers | [True, False] | True | RMLUI_THIRDPARTY_CONTAINERS |
– |
The options outlined above can be set in one’s conanfile.py or conanfile.txt, depending on preference.
The CMake options that are not supported along with a bit of reasoning are as follows:
RMLUI_SAMPLESbuilds example uses of the library, which would significantly increase the size of pre-built binary packages that Conan generates. In order to avoid this, the option is not offered and is always disabled. However, the recipe can always be edited locally to try them out.RMLUI_PRECOMPILED_HEADERSrequires a minimum CMake version that Conan can always provide and results in build time reduction with no apparent drawbacks, so it is sensible for it to be always enabled.RMLUI_TRACY_PROFILINGrequires a dependency that is not available from Conan’s central repository as of writing this, so it cannot be supported.
The RMLUI_CUSTOM_CONFIGURATION CMake option and others related to it (RMLUI_CUSTOM_CONFIGURATION_FILE, RMLUI_CUSTOM_INCLUDE_DIRS and RMLUI_CUSTOM_LINK_LIBRARIES) make it possible for the embedded robin-hood-hashing library to be upgradable.
If the recipe is out of date or somehow does not meet certain needs, then contributions would be welcome at conan-center-index.
Building using Devbox
Devbox is a package manager based on Nix which offers over 120,000 packages in many different programming languages, not just C/C++. Its design goals are to make consuming Nix packages simple, and not require users to know the Nix language. You can search for packages on nixos.org or nixhub.io. Here’s how to build RmlUi with Devbox:
- Install the Devbox package manager
git clone https://github.com/mikke89/RmlUi.gitcd RmlUidevbox init- Optionally, add the CMake package globally:
devbox global add cmake devbox add freetype freetype.dev glfw3devbox shell- Build the project:
cmake -B Build -S . --preset samples \
   -DRMLUI_BACKEND=GLFW_GL3 \
   -DCMAKE_C_COMPILER=clang \
   -DCMAKE_CXX_COMPILER=clang++ \
   -DCMAKE_PREFIX_PATH="$DEVBOX_PACKAGES_DIR"
cmake --build Build
Building on Windows
This section is aimed at users of Visual Studio, however the procedure should be transferable to other environments.
In addition to CMake, you need a copy of the FreeType library, version 2.13.3 is officially supported, although newer versions are normally backward compatible. You can find prebuilt dynamic Windows binaries here. Create the directory RmlUi/Dependencies/freetype if it does not exist, and copy the FreeType files here. Move the FreeType library file RmlUi/Dependencies/freetype/release dll/win64/freetype.lib to the new location RmlUi/Dependencies/lib/freetype.lib, and the include directory RmlUi/Dependencies/freetype/include to the parent directory RmlUi/Dependencies/include.
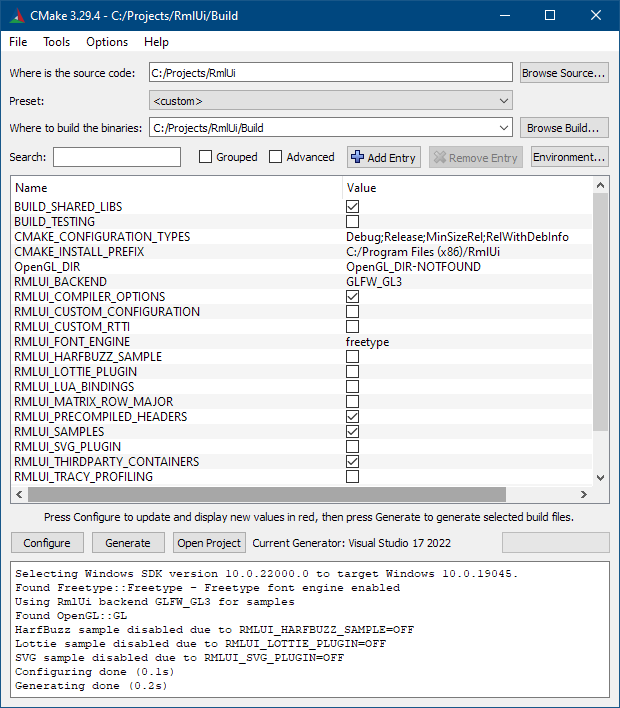
Next, start up cmake-gui and browse here to your RmlUi source code. Choose to build the binaries under RmlUi/Build. Click configure and select your Visual Studio version. Now there will be a few options appearing. See the CMake options in the section below for a description of some of them. If you’d like to take a look at the included samples, enable the RMLUI_SAMPLES option and set the RMLUI_BACKEND to Win32_GL2. You might want to select another backend later for additional features, but this is easy to get started with. Finally, click Generate. If it was successful, your Visual Studio solution file should be located at RmlUi/Build/RmlUi.sln.
If you use the dynamic binary version of FreeType, copy the RmlUi/Dependencies/freetype/release dll/win64/freetype.dll file into a place where the RmlUi applications can see it, such as RmlUi/Build. By default, this will be the working directory when starting applications from Visual Studio.
Open up the generated Visual Studio solution file. Now there should be several samples available in addition to the rmlui_core and rmlui_debugger projects. If you set the CMake option to build the samples, you can now right-click on rmlui_samples_invaders, and click Set as Startup Project. Finally, press F5 to start building and open the invaders demo when done. Enjoy!
Building on macOS and Linux
Open a terminal window, navigate to the RmlUi folder, and run the following commands:
cmake -B Build -S . -DRMLUI_SAMPLES=ON
cmake --build Build -j
This will build RmlUi together with all the samples, please see below for a list of all available CMake options. Assuming everything went well, the samples will be located under the Build folder. For example, to check out the invaders sample, run the following command:
Build/rmlui_sample_invaders
And enjoy!
Alternatively, a more interactive experience is available with the ccmake tool, which allows you to list and set all available CMake options. Again, navigate to the RmlUi folder in your terminal window, and execute the following command:
ccmake -B Build -S .
NOTE: The -B parameter sets the target build directory, while -S denotes the source directory where the CMakeLists.txt is located.
This will open a text mode application that lets you choose which parts of RmlUi you want to build and how you want to build it. Before you can alter any options you’ll need to press C so that CMake can scan your system configuration. Once it’s complete you will see a list of options. If you’d like to take a look at the included samples, enable the RMLUI_SAMPLES option.
Make your selection and press C again so that CMake can recalculate build settings based on your selection. Once CMake is happy you’ll be able to press G to generate the build configuration and then exit.
At this point you should be back at the terminal and your Makefile will have been created. You can now build RmlUi by executing make.
cmake --build Build -j
NOTE: The -j parameter tells the build tool to use parallel build.
Once the build is complete, you may want to have a look at the samples.
Building using Emscripten
RmlUi can be compiled using Emscripten into WebAssembly, which makes it possible to run the library on the Web or with other wasm runtimes. Follow the instructions on the Emscripten website to get started, make sure you have downloaded and installed the software for your platform. If you are on Windows we recommend to follow the instructions below using WSL. Verify that everything is in order by running emcc -v in your terminal which should output version information.
The CMake configuration in RmlUi enables the included samples to target Emscripten. To build the samples, first find the RmlUi source directory in your terminal, make a subdirectory, and enter it.
mkdir Build
cd Build
Then enter the following commands to configure CMake and build the WebAssembly targets for each sample.
emcmake cmake .. -DRMLUI_SAMPLES=ON -DBUILD_SHARED_LIBS=OFF
emmake make -j8
Each target should now be compiled into its generated WebAssembly .wasm file, together with a .data file containing all associated assets, as well as .html and .js files which allow the samples to be launched in a web browser. Note that, the web assembly program will not run when opening its html file directly, instead it must be served through a local webserver as described in the Emscripten tutorial.
To launch the compiled samples, first start a webserver in the same directory such as the one included with Python 3.
python3 -m http.server
After that, you can open your web browser and navigate to any of the samples. For example the demo sample should be located at http://localhost:8000/demo.html and the invaders sample at http://localhost:8000/invaders.html.
The samples all use the SDL_GL3 backend to target Emscripten. Feel free to take a look at its source code to understand how you can do the same for your application.
CMake presets
RmlUi provides CMake presets for some common workflows:
samplesEnable samples but only those without extra dependencies.samples-allEnable all samples, also those with extra dependencies.standaloneBuild the library without any dependencies, featuring thebitmap_fontsample.devEnable testing in addition to samples.dev-allEnable testing in addition to samples, including those that require extra dependencies.
These can be used during CMake configure, e.g. cmake -B Build --preset <preset> .... The presets should be combined with any options needed by your toolchain, such as CMAKE_BUILD_TYPE to select the desired build type when using single-configuration generators. You can also specify your own presets, possibly inheriting the provided ones, in a CMakeUserPresets.json file.
CMake options
This sections lists RmlUi options that can be passed during CMake configuration along with their default values. Each option can be configured on the command line, defined in a CMake user presets file, or set in a parent CMake project. As an example, the following command will configure the library to build with samples, using the GLFW with OpenGL 3 backend, in debug mode:
cmake -B Build -S . -DRMLUI_SAMPLES=ON -DRMLUI_BACKEND=GLFW_GL3 -DCMAKE_BUILD_TYPE=DEBUG
The following also lists any exported macros, which must be defined in the consuming project when changing certain default options. When using the generated CMake targets, these are normally handled automatically when importing the library, otherwise, they need to be defined manually.
CMake standard options
BUILD_SHARED_LIBSON- Build shared libraries (dynamic libraries, .dll/.so/.dylib) as opposed to static libraries (.lib/.a).
Exports macro:RMLUI_STATIC_LIBwhenOFF BUILD_TESTINGOFF- Build the included tests and benchmarks. This enables three separate executables, see the Test Suite readme for details.
rmlui_benchmarks. Benchmarks various components of the library to find performance hotspots and keep track of any regressions.rmlui_unit_tests. Tests smaller units of the library to ensure correctness.rmlui_visual_tests. A comprehensive test suite for visually testing the layout engine in particular, with automated screenshots and comparisons.
CMAKE_BUILD_TYPE- CMake standard option to choose the build type for single configuration generators. One of the options: Debug, Release, RelWithDebInfo, MinSizeRel.
Common options
RMLUI_BACKENDauto- Choose the backend to use for the samples, based on a supported combination of platform and renderer (e.g.
GLFW_GL3), orauto. RMLUI_SAMPLESOFF- Enable to build the included samples.
Plugins and dependencies
RMLUI_FONT_ENGINEfreetype- Select the default font engine from the following options:
freetype. Use FreeType for generating text.none. Use no default font engine, thereby allowing users to completely remove the FreeType dependency. If set, a custom font engine must be created and set throughRml::SetFontEngineInterfacebefore initialization. See thebitmapfontsample for an example implementation of a custom font engine.
RMLUI_HARFBUZZ_SAMPLEOFF- Enables the
harfbuzzsample. Requires the HarfBuzz dependency. RMLUI_LOTTIE_PLUGINOFF- Enables the Lottie plugin and sample. Requires the rlottie dependency.
RMLUI_LUA_BINDINGSOFF- Build the required bindings for Lua support. You’ll need Lua installed. Enables the following option:
RMLUI_LUA_BINDINGS_LIBRARYlua
Select the Lua library to use for the Lua bindings, one of the options:lua. Link to Lua.lua_as_cxx. Link to Lua compiled as C++, disables theextern Cheader wrappers. Exports macro:RMLUI_LUA_AS_CXX.luajit. Link to LuaJIT.
RMLUI_SVG_PLUGINOFF- Enables the SVG plugin and sample, requires the LunaSVG dependency.
RMLUI_TRACY_PROFILINGOFF- RmlUi has parts of the library tagged with markers for profiling with Tracy Profiler. This enables a visual inspection of bottlenecks and slowdowns on individual frames. To compile the library with profiling support, ensure that Tracy Profiler is made available to CMake, such as by installing the library in your package manager, or by adding it to
/Dependencies/tracy/within the RmlUi directory. Then, enable this option and compile. Follow the Tracy Profiler instructions to build and connect the separate viewer. Enables the following options:RMLUI_TRACY_CONFIGURATIONON
The CMake setup will try to add a new configuration called ‘Tracy’ which can be selected in e.g. Visual Studio next to the ‘Debug’ and ‘Release’ configurations, otherwise the profiler will be enabled on the entire project.RMLUI_TRACY_MEMORY_PROFILINGON
By default, RmlUi will override the global new and delete operators in C++ when Tracy profiling is enabled, to make allocation statistics available. Turn thisOFFto disable overriding the global operators.
Exports macro:
RMLUI_TRACY_PROFILINGfor enabled configurations whenON.
Backend options
RMLUI_BACKEND_SIMULATE_TOUCHOFF- Simulate touch events from mouse events in the backend. This is useful for testing touch input on platforms without touch support. Only implemented in selected backends, a CMake warning will be emitted if it’s not supported in the current configuration.
Build and install options
RMLUI_COMPILER_OPTIONSON- Let RmlUi set certain compiler-specific options on provided targets, such as for supported warning flags and multi-process builds.
RMLUI_INSTALL_RUNTIME_DEPENDENCIESON- Automatically install runtime dependencies on supported platforms (e.g. DLLs).
RMLUI_PRECOMPILED_HEADERSON- Enables the use of precompiled headers on supported compilers for speeding up compilation times. This requires CMake version 3.16 or greater.
Advanced customization
RMLUI_CUSTOM_CONFIGURATIONOFF- RmlUi’s default configuration
<RmlUi/Config/Config.h>can be overridden by enabling this option. In this way it is possible to replace several types including containers to other STL-compatible containers (such as EASTL), or to STL containers with custom allocators. After enabling this option, three new variables can be set:RMLUI_CUSTOM_CONFIGURATION_FILE
Set the path to the new configuration file, the default configuration can be used as a template to create this file. E.g.MyRmlUiConfig.h.
Exports macro:RMLUI_CUSTOM_CONFIGURATION_FILE.RMLUI_CUSTOM_INCLUDE_DIRS
Optionally set additional include directories that may be required by the new configuration file. E.g.C:\MyProject\.RMLUI_CUSTOM_LINK_LIBRARIES
Optionally set additional libraries to link with.
RMLUI_CUSTOM_RTTIOFF- When enabled, will configure RmlUi to disable all use of RTTI (e.g. dynamic_cast) and replace them by a custom solution. Does not set any compiler flags to disable RTTI or exceptions, if desired, users can do so manually for their compiler toolchain.
Exports macro:RMLUI_CUSTOM_RTTIwhenON. RMLUI_MATRIX_ROW_MAJOROFF- By default, RmlUi uses a column-major matrix implementation. By enabling this option, the matrix type is changed to a row-major representation.
Exports macro:RMLUI_MATRIX_ROW_MAJORwhenON. RMLUI_THIRDPARTY_CONTAINERSON- RmlUi comes bundled with some third-party container libraries for improved performance. For users that would rather use the
stdcounter-parts, this option can be turned off. Selected containers are included using a preprocessor definition.
Exports macro:RMLUI_NO_THIRDPARTY_CONTAINERSwhenOFF.